-2.jpg)
We are constantly searching for search for the ultimate solution to one of the hardest areas of aircraft modelling, the cockpit. Alas, that one stop - fix all solution - the silver bullet if you will has not yet been found. Qunita Studio seems to have an interesting proposal in their new and much talked about interior 3D-decal detail sets. Gary has some at hand, and he shows us just what they contain and how they apply to a real model in his review...-2.jpg) Construction Review: Qunita Studio Interior 3D-Decals - Detail Sets
Construction Review: Qunita Studio Interior 3D-Decals - Detail Sets
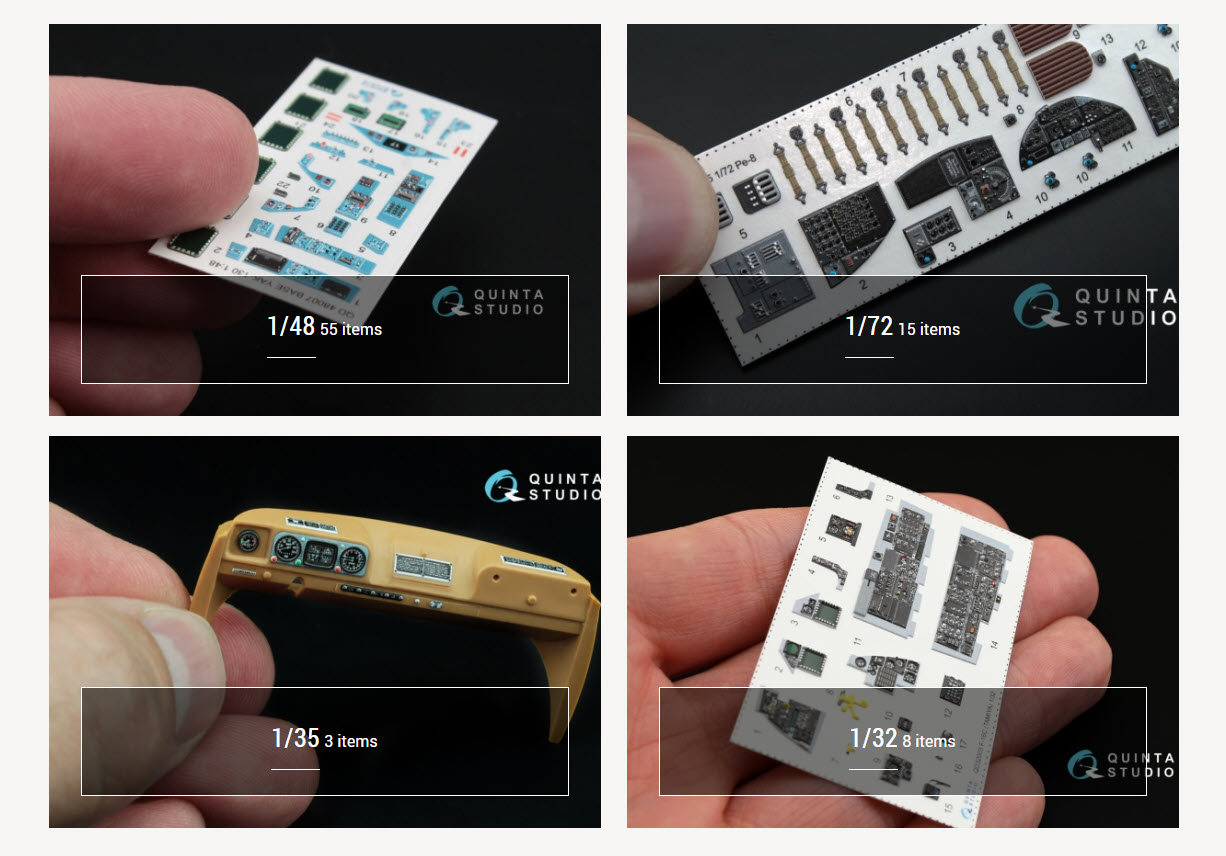
Scales: Various (1/35th, 1/32nd, 1/48th, 1/72nd)
Manufacturer Links : Facebook Link, Website:-2.jpg)
-2.jpg)
Overall, I'm very impressed with these new sets from Quinta Studios. I have absolutely no hesitation in recommending them to modellers of all skill levels, from beginner to advanced. I have heard some people say they "feel like cheating" and given how easy they are to use I can understand that sentiment. I myself see them as just another option to enhance our models so that we may get more enjoyment from the hobby.
Gary Wickham
.jpg)
Scales: Various (1/35th, 1/32nd, 1/48th, 1/72nd)
Manufacturer Links : Facebook Link, Website:
.jpg)
Qunita Studio is a new aftermarket company specializing in the production of clear canopy and interiors for model kits. Based in Russia, the Quinta team has been rapidly building a catalogue of cockpit detail sets, sometimes releasing a new set each week.
 Quinta has captured a lot attention from the modelling community because they use 3D colour printing to incorporate a wide range of embossed details such as recessed instrument dials, their raised outlines, instrument blocks, switches, buttons, signal lamps, levers and handles, riveting detail and so on.
Quinta advertises the following features as differentiators for their product:
- The glass in instruments of the dashboard are perfectly smooth and give excellent gloss
- The smallest elements and inscriptions can sometimes be read under strong magnification.
- We take the authenticity of colours very seriously and carefully, matching from actual colours.
- Unlike other manufacturers, we are not afraid to show real photos of how our product looks on a macro photo, with a strong increase (20X), but not only a photo of an electronic layout.
- Our product is convenient in operation and easy to install, since there is no need to collect "sandwiches", as in photo-etching
-2.jpg) The 3D printing process manages to combine the raised surface details typically found on resin parts with the ease of use provided by coloured photo-etch parts.
The 3D printing process manages to combine the raised surface details typically found on resin parts with the ease of use provided by coloured photo-etch parts.
In what seems like a very short time, the team at Quinta have amassed an impressive line up of interior detail sets for aircraft cockpits in all popular scales (1/32, 1/48 and 1/72). Luckily for me they have more in 1:48 (my favourite scale) than the others at present and I will admit to getting a bit carried away with my order.
-4.jpg) When I first saw the Quinta sets popping up on the forums and Facebook groups, like most modellers, I had a myriad of questions about how they actually worked. The detail looked amazing in photos but how did you apply them ? Were they delicate like normal water slide decals and if so what steps were needed to get them to work properly ?
When I first saw the Quinta sets popping up on the forums and Facebook groups, like most modellers, I had a myriad of questions about how they actually worked. The detail looked amazing in photos but how did you apply them ? Were they delicate like normal water slide decals and if so what steps were needed to get them to work properly ?
-2.jpg) Frustratingly the information provided by Quinta and the forums seemed to be of limited help and so it was not until I finally got hold of some sets that I could understand what they are, and more importantly what they are not.
Frustratingly the information provided by Quinta and the forums seemed to be of limited help and so it was not until I finally got hold of some sets that I could understand what they are, and more importantly what they are not.
A good place to start is the small instruction sheet that Quinta includes with each set. This has some useful information which is very worthwhile reading to get a better understanding of this new product.
-2.jpg) The main takeaways from this information sheet is that the parts are made from 'polymerized vinyl', unlike normal printed decals. They are significantly thicker than normal decals and so need adhesive to keep them secured to the model and you do not (and should not) use traditional decal setting solutions when working with them.
The main takeaways from this information sheet is that the parts are made from 'polymerized vinyl', unlike normal printed decals. They are significantly thicker than normal decals and so need adhesive to keep them secured to the model and you do not (and should not) use traditional decal setting solutions when working with them.
What we want to know about these sets:
This was a good start, but as part of my review I wanted to try and answer the following five questions by using a Quinta set on an actual model:
- How different to normal decals are they really ?
- What's the best way to apply/secure them. Do you need to use glue or do they adhere like normal decals ?
- Is the colouring double-sided ?
- How well do they fit the target model ?
- Can you apply weathering and washes over them ?
To help me answer these questions I selected the set for my HobbyBoss 1/48 F-105G Thunderchief set (QD48073) and began by reading the 'Working Tips' instruction sheet.
-4.jpg)
-2.jpg) Having now inspected the sheet closely and read the install steps I was pretty sure that what we had here was thin vinyl parts attached to some standard decal backing paper and that once released from the backing paper these vinyl parts would be standalone and I could store them until I was ready to apply to the model using a suitable acrylic adhesive. Eager to test that theory I submerged some into warm water just like a normal decal.
Having now inspected the sheet closely and read the install steps I was pretty sure that what we had here was thin vinyl parts attached to some standard decal backing paper and that once released from the backing paper these vinyl parts would be standalone and I could store them until I was ready to apply to the model using a suitable acrylic adhesive. Eager to test that theory I submerged some into warm water just like a normal decal.
-2.jpg) After less than 15 seconds the vinyl parts could easily be picked up off the paper with some tweezers. No need to slide them off like normal decals as these parts were quite sturdy and I dried off any excess water on them using a paper towel and cotton bud. Remember these parts are made from vinyl which does not absorb water, so its only surface water to be dealt with. Each part was put now put aside (on a plastic tray) for use later on.
After less than 15 seconds the vinyl parts could easily be picked up off the paper with some tweezers. No need to slide them off like normal decals as these parts were quite sturdy and I dried off any excess water on them using a paper towel and cotton bud. Remember these parts are made from vinyl which does not absorb water, so its only surface water to be dealt with. Each part was put now put aside (on a plastic tray) for use later on.
Are these like normal decals ?
So this mostly answered my first question: Are these like normal decals ? The answer, not really. They do come on decal backing paper that needs water to release them but after that they are not like normal decals at all. Once off the backing paper they are more like pre-painted photo-etch parts than a decal.
-2.jpg)
-2.jpg)
 With most of the general mystery surrounding these sets now cleared up I began to more thoroughly consult the assembly guide for the F-105G as to which parts needed to go where. The paper diagrams are a bit small and crowded but the layout makes sense and it's fairly easy to figure out what needs to go where. As I do sometimes with small diagrams I scanned them into the computer which allowed me to zoom in whenever it was needed.
With most of the general mystery surrounding these sets now cleared up I began to more thoroughly consult the assembly guide for the F-105G as to which parts needed to go where. The paper diagrams are a bit small and crowded but the layout makes sense and it's fairly easy to figure out what needs to go where. As I do sometimes with small diagrams I scanned them into the computer which allowed me to zoom in whenever it was needed.
-2.jpg) Despite being 3D printed, it now dawned on me that for some parts it was still necessary to build up layers using separate parts. A good example is the radar scope in the centre of both instrument panels on the F-105G. The separate scope parts (14) simply need to be glued on top of the base panels as shown.
Despite being 3D printed, it now dawned on me that for some parts it was still necessary to build up layers using separate parts. A good example is the radar scope in the centre of both instrument panels on the F-105G. The separate scope parts (14) simply need to be glued on top of the base panels as shown.
Another thing that I noticed was that on some of the thicker parts the colouring was not applied all the way through. As you can see on the side of the radar scope part it's not black but white. I saw this on a several other parts and an easy fix was to hand paint the edges with black. I guess this must be a limitation of the printing technology.
-2.jpg) Now I had the basic mechanics of how the Quinta sets worked out, it was time to see how they fared when used on the model itself. I guess it served me right for picking a HobbyBoss kit for my first outing with a Quinta set because when I did a dry fit of the kit cockpit tub I noticed something completely unexpected. There was a huge gap between the tub and the side walls, the cockpit side consoles were not wide enough. Thanks HobbyBoss...
Now I had the basic mechanics of how the Quinta sets worked out, it was time to see how they fared when used on the model itself. I guess it served me right for picking a HobbyBoss kit for my first outing with a Quinta set because when I did a dry fit of the kit cockpit tub I noticed something completely unexpected. There was a huge gap between the tub and the side walls, the cockpit side consoles were not wide enough. Thanks HobbyBoss...
-2.jpg) My initial reaction was to put it back in the box and choose another subject, but I decided to see how Quinta had dealt with this problem (if at all). To my very pleasant surprise I found that Quinta had taken the time and care to identify the same problem I had found and include correctly sized parts in their set, not just take the easy way out and make vinyl panels to fit the incorrect kit side consoles. Another gold star for Quinta on this one.
My initial reaction was to put it back in the box and choose another subject, but I decided to see how Quinta had dealt with this problem (if at all). To my very pleasant surprise I found that Quinta had taken the time and care to identify the same problem I had found and include correctly sized parts in their set, not just take the easy way out and make vinyl panels to fit the incorrect kit side consoles. Another gold star for Quinta on this one.
-2.jpg) Because Quinta had made the effort to correct the HobbyBoss error I felt obliged to carry on with the F-105G and so I used the Quinta panels as a guide for some plasticard additions to the HB tub. I also took some extra time to fix up a few HB omissions as well like adding some sides of the centre console and properly detailing the top of both IP's.
Because Quinta had made the effort to correct the HobbyBoss error I felt obliged to carry on with the F-105G and so I used the Quinta panels as a guide for some plasticard additions to the HB tub. I also took some extra time to fix up a few HB omissions as well like adding some sides of the centre console and properly detailing the top of both IP's.
-2.jpg) To make way for the new Quinta vinyl panels it's necessary to remove all the existing raised detail on the kit parts. For this I like to use a rounded blade and scrape across the plastic. Why a rounded blade ? Well it allows me to position the blade at a wider range of angles than a normal #11 straight blade would cope with. In the end, it does not really matter how you remove the detail (scrape, sand or grind), just get rid of it.
To make way for the new Quinta vinyl panels it's necessary to remove all the existing raised detail on the kit parts. For this I like to use a rounded blade and scrape across the plastic. Why a rounded blade ? Well it allows me to position the blade at a wider range of angles than a normal #11 straight blade would cope with. In the end, it does not really matter how you remove the detail (scrape, sand or grind), just get rid of it.
-2.jpg)
 Starting with the sidewalls I used the cockpit tub as a guide to make pencil marks where the vinyl panels needed to be located. The Quinta parts were the exact right length and did not require any trimming at all to line up perfectly with the HB fuselage. For the adhesive I decided to try some MiG Ammo "Ultra Glue". I like this glue as it's a bit like PVA (water soluble) but results in a much tougher bond. I used a brush to apply the glue to the back of the vinyl parts as I figured this would be more precise (less messy) than applying it to the kit parts first.
Starting with the sidewalls I used the cockpit tub as a guide to make pencil marks where the vinyl panels needed to be located. The Quinta parts were the exact right length and did not require any trimming at all to line up perfectly with the HB fuselage. For the adhesive I decided to try some MiG Ammo "Ultra Glue". I like this glue as it's a bit like PVA (water soluble) but results in a much tougher bond. I used a brush to apply the glue to the back of the vinyl parts as I figured this would be more precise (less messy) than applying it to the kit parts first.
-2.jpg) With the Ultra Glue applied you have a few minutes to get the part into place. The vinyl is rigid enough to be able to hold it easily with normal tweezers and position it correctly. I then found using a cotton bud to push each part of the vinyl onto the plastic helped get it seated properly. This process was MUCH easier than working with photo-etch brass using super glue. The vinyl and acrylic glue is far more forgiving.
With the Ultra Glue applied you have a few minutes to get the part into place. The vinyl is rigid enough to be able to hold it easily with normal tweezers and position it correctly. I then found using a cotton bud to push each part of the vinyl onto the plastic helped get it seated properly. This process was MUCH easier than working with photo-etch brass using super glue. The vinyl and acrylic glue is far more forgiving.
-2.jpg) The side consoles have several smaller panels that need to be layered on top as shown. You can do that before you attach the main panel to the tub or afterwards, it makes no real difference.
The side consoles have several smaller panels that need to be layered on top as shown. You can do that before you attach the main panel to the tub or afterwards, it makes no real difference.
-2.jpg) What is the fit of the parts like?
What is the fit of the parts like?
After only a few minutes (literally) of gluing and positioning the panels the front cockpit was complete. I was happily surprised just how easy it was to do. Another of my initial questions, What is the fit of the parts like? was now answered. The fit was near perfect.
-2.jpg)
-2.jpg)
 Remembering that one of my five initial review questions was to explore How these vinyl parts react to weathering and washes. This task reminded me of the line in "The Hunt for Red October" where Capt Ramius (Sean Connery) tells Jack Ryan, "Be careful what you shoot at. Most things in here don't react too well to bullets". I was really hoping the the Quinta vinyl parts would be resilient enough to handle at least some light enamel/oil based washes and not explode in my face.
Remembering that one of my five initial review questions was to explore How these vinyl parts react to weathering and washes. This task reminded me of the line in "The Hunt for Red October" where Capt Ramius (Sean Connery) tells Jack Ryan, "Be careful what you shoot at. Most things in here don't react too well to bullets". I was really hoping the the Quinta vinyl parts would be resilient enough to handle at least some light enamel/oil based washes and not explode in my face.
My current go-to wash products are the Tamiya Panel Line range and the MiG Ammo Oilbrushers. I applied these to the cockpit (including all the Quinta parts) as normal (perhaps a little lighter) to see what happened.
- Our product is convenient in operation and easy to install, since there is no need to collect "sandwiches", as in photo-etching
.jpg)
In what seems like a very short time, the team at Quinta have amassed an impressive line up of interior detail sets for aircraft cockpits in all popular scales (1/32, 1/48 and 1/72). Luckily for me they have more in 1:48 (my favourite scale) than the others at present and I will admit to getting a bit carried away with my order.
-3.jpg)
.jpg)
A good place to start is the small instruction sheet that Quinta includes with each set. This has some useful information which is very worthwhile reading to get a better understanding of this new product.
.jpg)
What we want to know about these sets:
This was a good start, but as part of my review I wanted to try and answer the following five questions by using a Quinta set on an actual model:
- How different to normal decals are they really ?
- What's the best way to apply/secure them. Do you need to use glue or do they adhere like normal decals ?
- Is the colouring double-sided ?
- How well do they fit the target model ?
- Can you apply weathering and washes over them ?
To help me answer these questions I selected the set for my HobbyBoss 1/48 F-105G Thunderchief set (QD48073) and began by reading the 'Working Tips' instruction sheet.
-3.jpg)
.jpg)
.jpg)
Are these like normal decals ?
So this mostly answered my first question: Are these like normal decals ? The answer, not really. They do come on decal backing paper that needs water to release them but after that they are not like normal decals at all. Once off the backing paper they are more like pre-painted photo-etch parts than a decal.
.jpg)
Is the colouring double sided ?
I also answered another of my questions pretty quickly, Is the colouring double sided ? For parts that are going to glued down onto the kit (such as side consoles) you don't need the colouring to be on both sides, but for parts like pull handles or levers that stand off from the kit parts you ideally want the colouring to be seen from both sides. Well, I'm happy to report for all the parts that you would expect to be double sided (like these ejection seat pull handles) Quinta have printed them that way. This shows to me that Quinta have been clever about how they design and print these sets. For this I gave them my first gold star..jpg)
Are they flexible?
Another benefit of the use of vinyl is flexibility. I tested this side wall detail part by stretching and bending it and was pleased to find that it was easily able to handle any "reasonable" stress I applied. It's worth noting that later on I did manage to accidentally tear one of the thinner parts so remember they are delicate and proceed accordingly..jpg)
.jpg)
Another thing that I noticed was that on some of the thicker parts the colouring was not applied all the way through. As you can see on the side of the radar scope part it's not black but white. I saw this on a several other parts and an easy fix was to hand paint the edges with black. I guess this must be a limitation of the printing technology.
.jpg)
.jpg)
.jpg)
.jpg)
.jpg)
A quick coat of paint was next applied prior to beginning the process of attaching the Quinta panels.
.jpg)
.jpg)
.jpg)
.jpg)
After only a few minutes (literally) of gluing and positioning the panels the front cockpit was complete. I was happily surprised just how easy it was to do. Another of my initial questions, What is the fit of the parts like? was now answered. The fit was near perfect.
.jpg)
I had to make no adjustment or trimming to any of the Quinta parts to get the result you see here. Yet another gold star for Quinta !!
.jpg)
Encouraged by the results of the front cockpit in equally short order the rear cockpit was also assembled and once again the fit was superb. I needed to trim only one of the side console panels but this was a breeze using a pair of small scissors. Far easier than doing the same with photo-etch brass. A quick dry fit to the fuselage half showed that everything aligned properly. I was a little disappointed that the raised sidewall detail was not quite deep enough to meet up with the new wider side consoles. Much better than what we started with from HB but an extra 2mm on the Quinta set would have been ideal.
.jpg)
.jpg)
Once again the Quinta parts did not disappoint and as you can see I was able to generously apply both washes without any visible impact to the vinyl. I always clean up any excess wash using Artist White Spirit and this too did not seem to aggravate the Quinta vinyl. A final gold star to Quinta.
-2.jpg) Typically my last step when painting and weathering a cockpit would be to apply a final overall flat coat. In the this case however I skipped that step due to the lovely glass effect that Quinta have applied to all the instruments as shown here. The vinyl finish may be a little shiny for my taste but I can live with it given the amount of work it has saved me.
Typically my last step when painting and weathering a cockpit would be to apply a final overall flat coat. In the this case however I skipped that step due to the lovely glass effect that Quinta have applied to all the instruments as shown here. The vinyl finish may be a little shiny for my taste but I can live with it given the amount of work it has saved me.
-2.jpg) Now that I had finished I became curious to see how these new Quinta detailing sets stacked up against the other available options. As I happened to have a couple of the Eduard LooK sets handy for the Tamiya IL-2 and Tamiya P-38 kits I took some side by side photos to better compare the Quinta and Eduard offerings. You be the judge.
Now that I had finished I became curious to see how these new Quinta detailing sets stacked up against the other available options. As I happened to have a couple of the Eduard LooK sets handy for the Tamiya IL-2 and Tamiya P-38 kits I took some side by side photos to better compare the Quinta and Eduard offerings. You be the judge.
-2.jpg)
 CONCLUSION - Quinta Studios 3D-Decal Cockpit Detail Sets
CONCLUSION - Quinta Studios 3D-Decal Cockpit Detail Sets
At the start of this review I set myself the goal of answering five key questions about the new Quinta detail sets. Along the way I learnt a lot about how to work with these sets and formed an appreciation for what they can offer modellers.
Question Answer Rating:
How different to normal decals are they really ?
.jpg)
.jpg)
The P38 Lightning set comparison
.jpg)
A comparison of the Il-2 set also against the "LooK" set
.jpg)
At the start of this review I set myself the goal of answering five key questions about the new Quinta detail sets. Along the way I learnt a lot about how to work with these sets and formed an appreciation for what they can offer modellers.
Question Answer Rating:
How different to normal decals are they really ?
They are very different to the decals we are used to. In fact about the only thing these 3D-Decals have in common with normal decals is the backing paper used. -
What's the best way to apply/secure them. Do you need to use glue or do they adhere like normal decals ?
Each part on the sheet is made from vinyl and once removed from the backing paper requires some form of adhesive to secure them on the model. Placing them on the surface of the model (like a normal decal) without any adhesive would not work well at all. -
Is the colouring double-sided ?
Yes, for parts that will be seen from either side Quinta have made sure the colouring is present on both sides. A+
How well do they fit the target model ?
How well do they fit the target model ?
Well I've only tried them on one model so far but as you've seen the fit is close to perfect. A+
Can you apply weathering and washes over them ?
Can you apply weathering and washes over them ?
Yes, I was able to apply both enamel and oil washes to the Quinta parts with no apparent negative effect. A+
How easy are they to use ?
How easy are they to use ?
I would rate them as very easy to use, especially when compared to the alternatives of resin parts or pre-painted photo-etch. The vinyl is easy to work with and allows you to use acrylic adhesives that are far more forgiving than CA glue. A+
For those of you who don't like to read but have made it this far Gary's video illustration of the kit 😉
Overall, I'm very impressed with these new sets from Quinta Studios. I have absolutely no hesitation in recommending them to modellers of all skill levels, from beginner to advanced. I have heard some people say they "feel like cheating" and given how easy they are to use I can understand that sentiment. I myself see them as just another option to enhance our models so that we may get more enjoyment from the hobby.
Gary Wickham
Thanks to Creative Models for sending Gary this sample to use and review. You can get these from the Creative Models Website

TO find out more about Quinta's full range head to their FB page or alternatively their Webpage