In three parts Andy Moore has taken Resin Scales Object 703 II kit from raw 3D print to what you see in front of you. Today we follow the completion of the kit, with paint, weathering & finishing in the final part of the story...
Build Review: Soviet Object 703 Version II
Manufacturer – Resin Scales
Kit Number – RSOBJ703
1/35th Scale
Price – US$160 from Resin Scales
Product Link on the Resin Scales Website
Previous Parts of this story:
Today
- Build review: 1/35th scale Soviet Object 703 Version II from Resin Scales - Paint, weathered & finished!
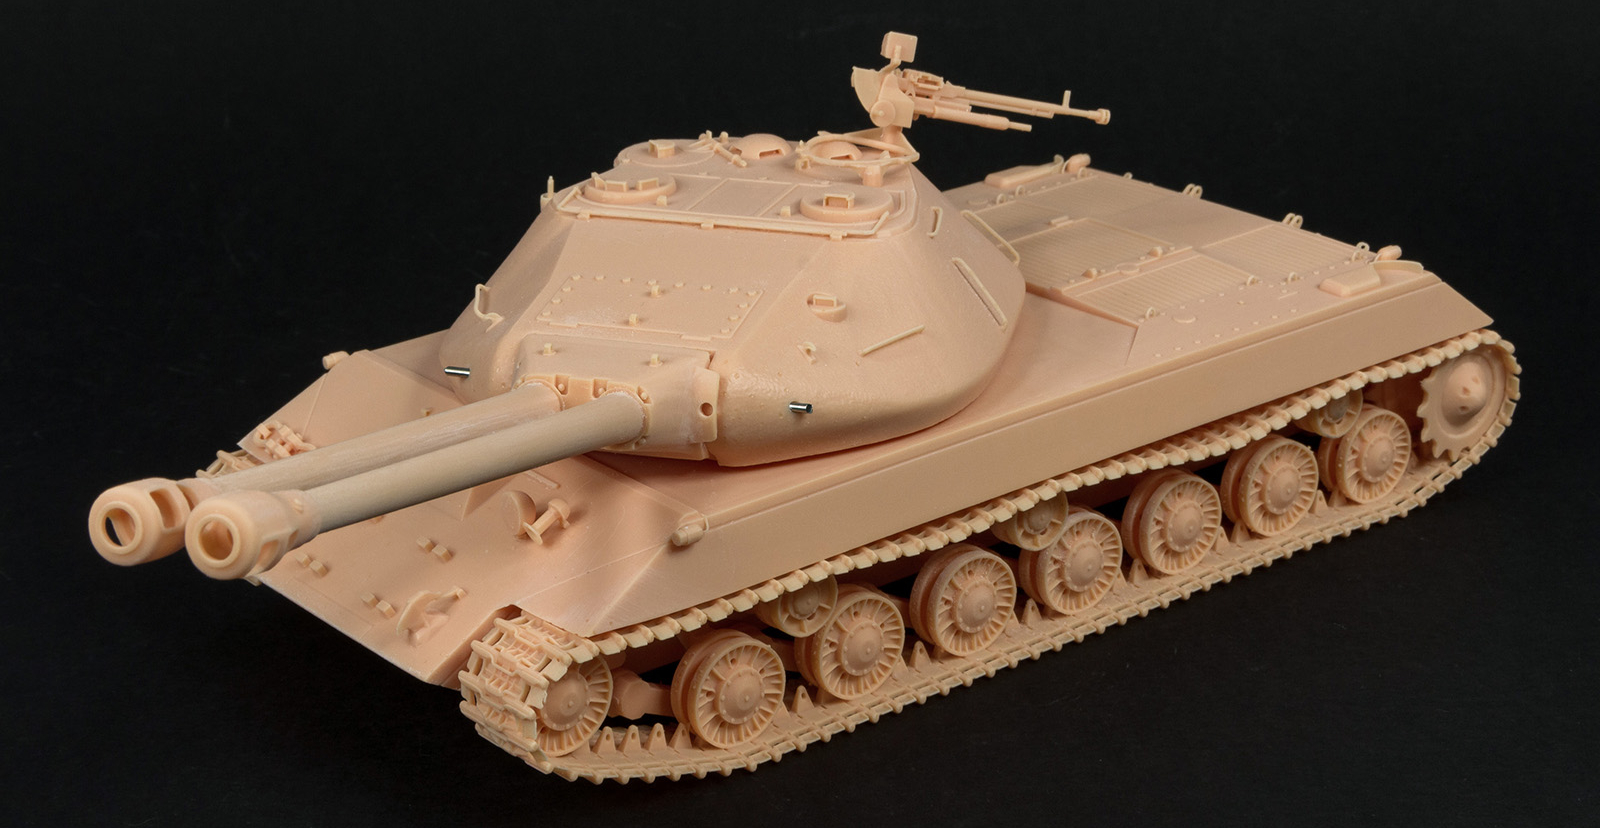
Last time out we built up Resin Scales 3D printed Object 703 V II, and added a little customisation based on the tank's appearance in the World of Tanks game. Today we'll jump straight into the painting and weathering steps, starting out with a primer coat. Just like working with traditional cast resin parts, 3D print resin benefits from a good primer base, and here I mixed up a dark rust tone from AMMO Black and Rust primers and applied an even coat to the parts, before leaving them for a couple of days to allow the primer to fully cure.


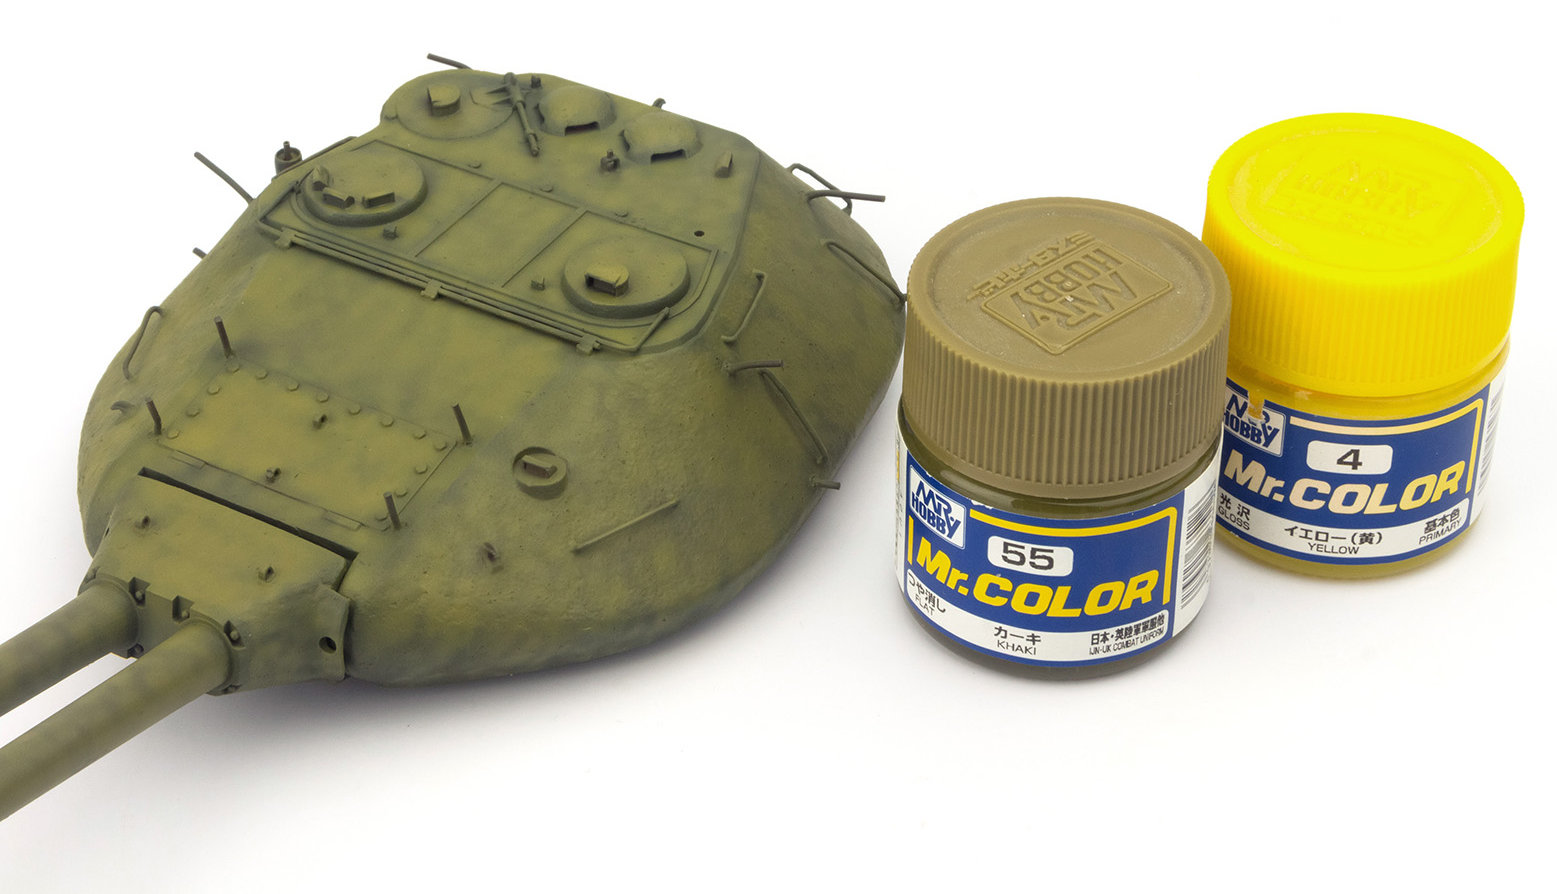
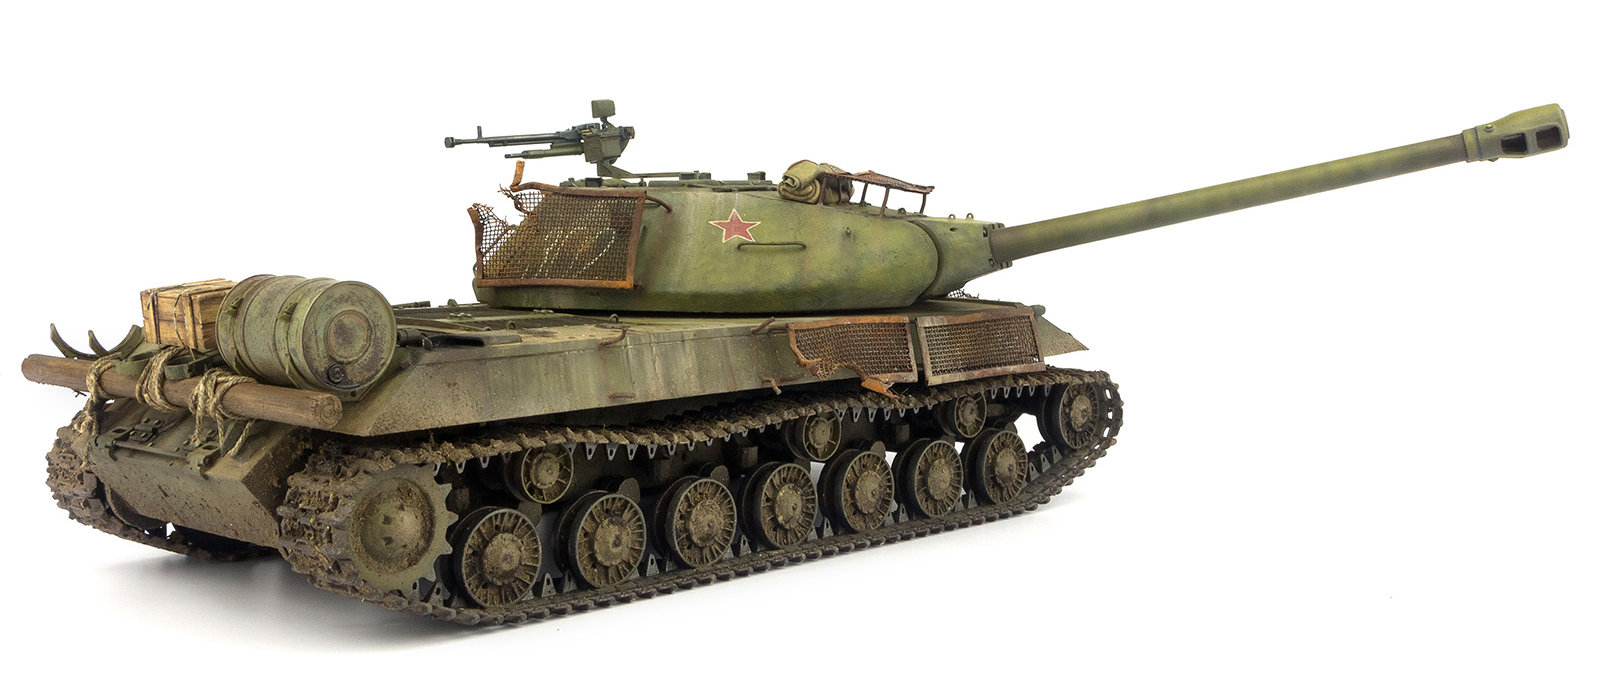
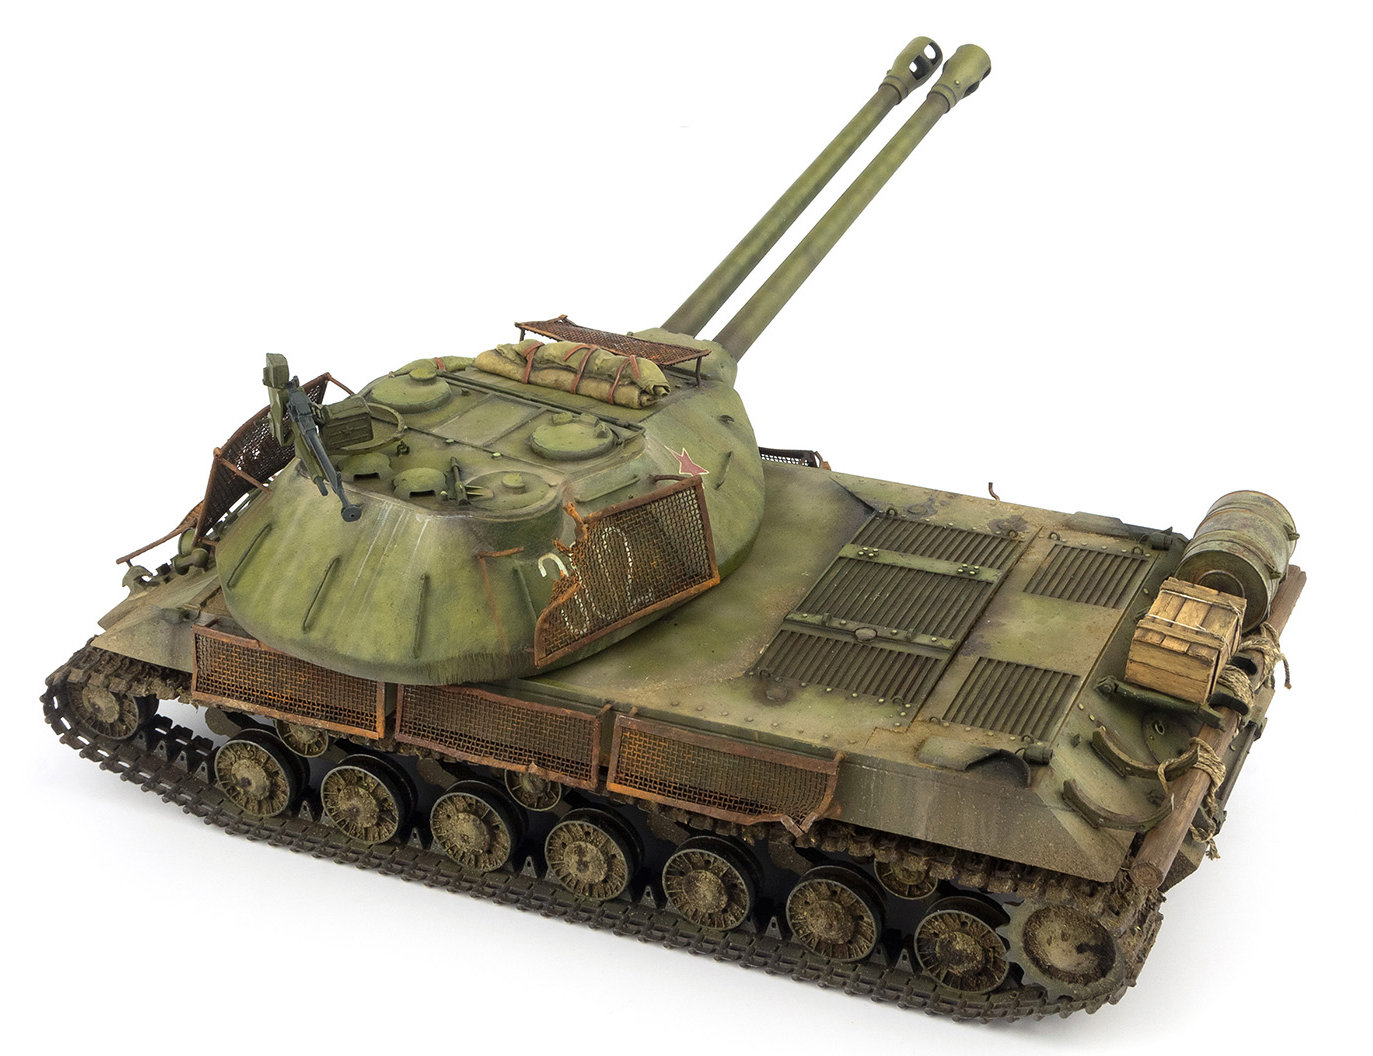
The tanks in WoT can feature some pretty extravagant camo schemes, but I elected to go with a more regular finish for this build. I chose Mr Color Russian Green for the main base coat, applying this in a soft mottled pattern, while allowing some of the previous pre-shade layer to show through. Once the mottled coat was down, I added more thinner to the remaining paint and sprayed a fine mist coat to help blend and soften the effects of the mottling.
To finish off the main painting stage I added a further mottle coat over the upper surfaces, this time using a much lighter shade mixed from Mr Colour Khaki and Yellow. This helped to brighten up the model and compensate for any darkening that would come from the weathering steps.
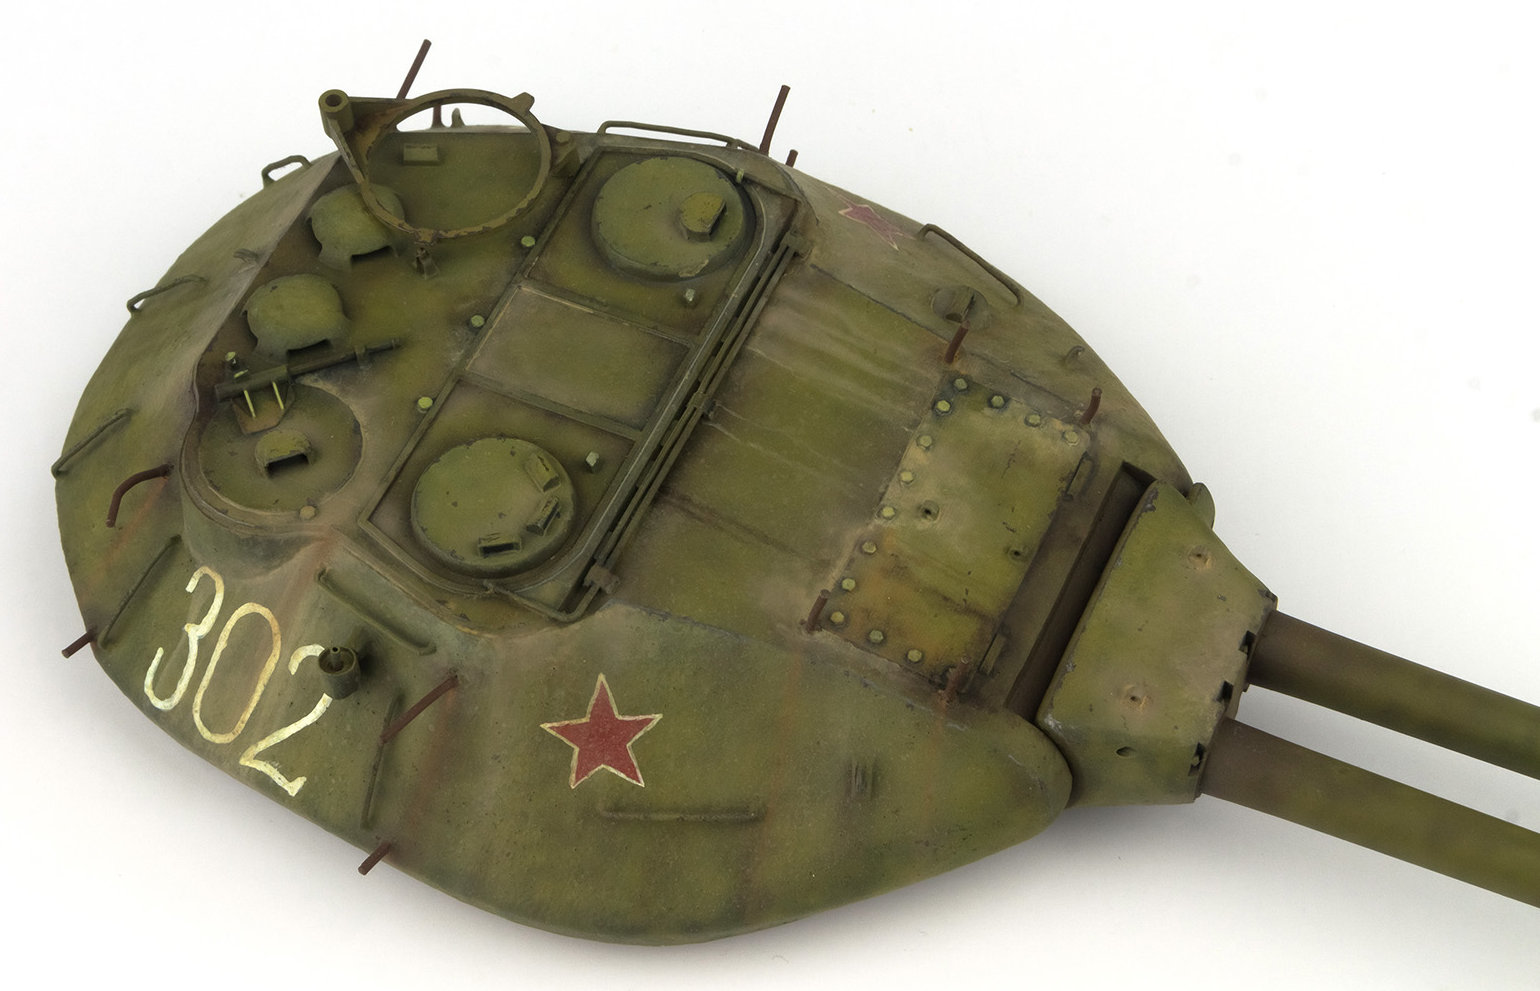
There are no decals included with the kit which is a shame, especially at the price point this sells at, but most modellers will have something suitable in the spares box. In this case, I decided to hand paint the markings, consisting of turret numbers and Soviet stars. These didn't need to be perfectly done, as real markings would have been hand-painted anyway.
To begin the weathering process, I mixed up a dirty brown shade from Tamiya acrylics and sprayed this around the panel's lines and in shadow areas. This whole step was kept fairly loose, and was as much about adding some randomness to the finish as it was about defining the details of the model.
The remainder of the weathering was a combination of oil washes using various earth and dust colours, and some airbrushing using similar paint shades to subtly blend the oil effects. The supports for the mesh armour were picked out by hand using Lifecolor rust paints, followed by some rusty oil streaks on the turret sides. Finally, some restrained chipping was added with a graphite stick around the corners and edges of the turret and hull.
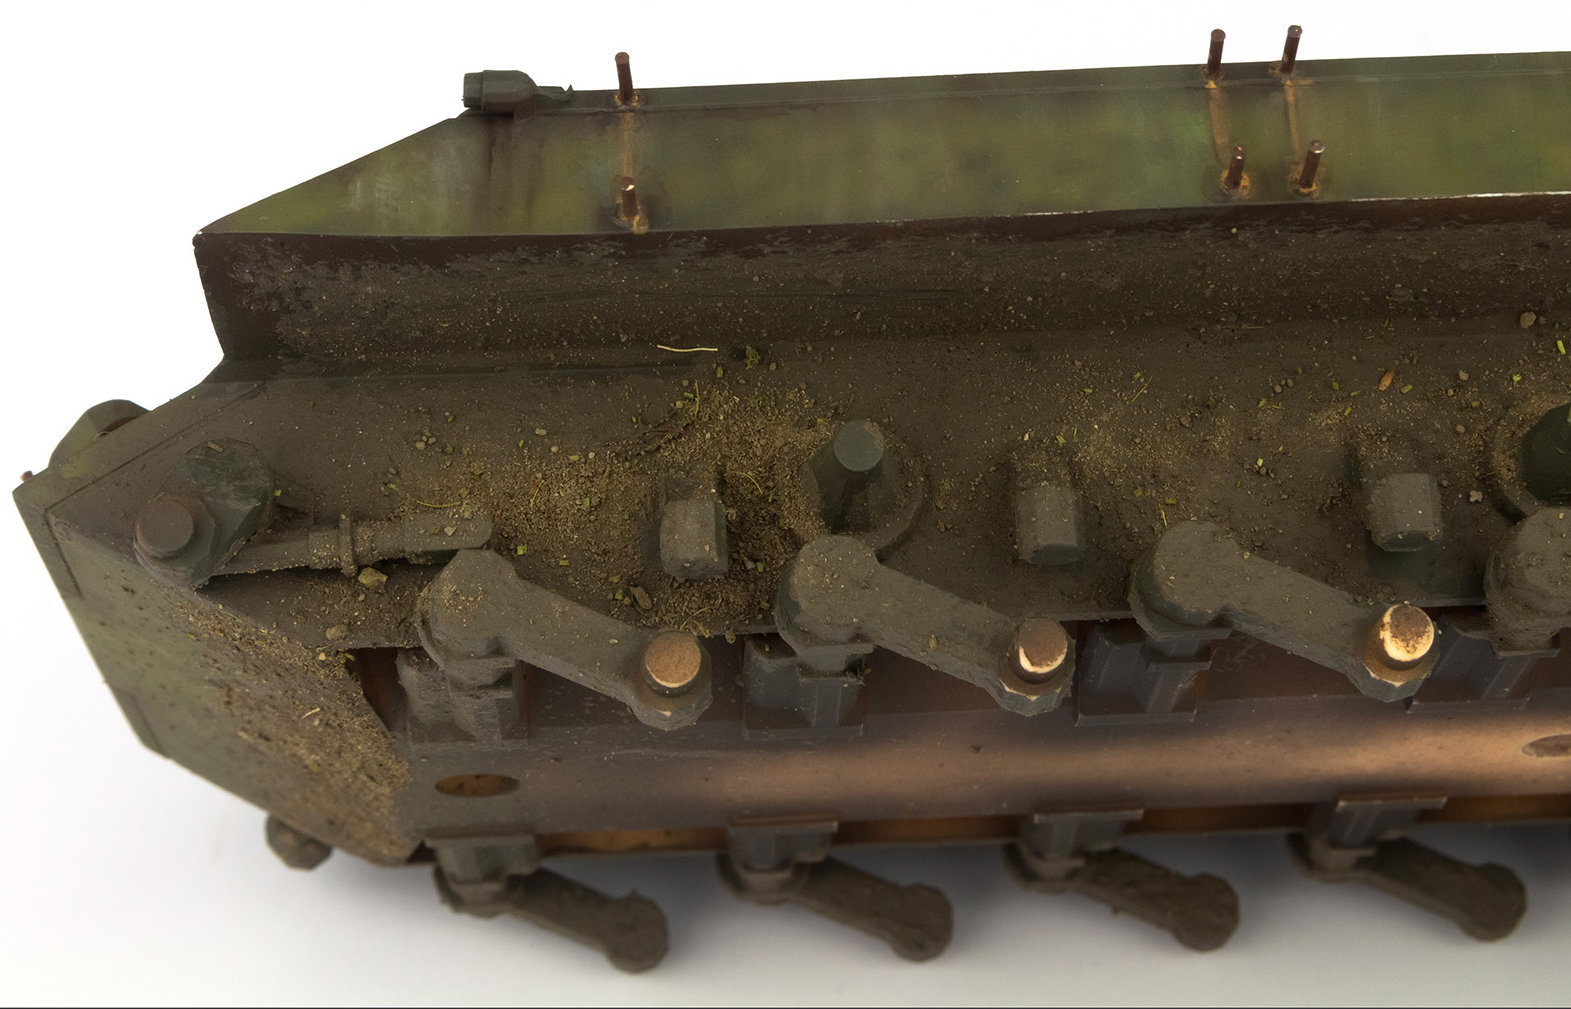
Whilst the majority of the kit is very highly detailed, there are a few simplified areas, the principal one being the suspension arms. This area isn't all that prominent once the wheels and tracks are in place, but to help disguise the lower detail I added a textured mud mix to the lower hull and suspension arms. This was created from dried garden soil mixed with small pieces of lichen and dried grass, then bound together using an AK Interactive diorama texture paste.
The mixture was daubed quite liberally around the suspension components and lower hull. In some areas, I sprinkled more dry soil over the wet mixture to create further texture. Once this was dry, I lightly over-sprayed the area with an earth shade to unify the finish.
For the tracks, I decided to leave the basic primer coat as the main finish. The wheels were sprayed with the same green used for the hull and turret, and any over-spray on the tracks touched in by hand. The wheel rims were then given a polished metal look by burnishing them with a graphite stick, a process that was eased greatly by having the upper run removed. It was only after painting that realised just how well the wheels had been printed. They really do look as good, if not better than anything you'd get with an injection moulded kit.
During the build, I'd decided to add some additional accessories to the build, including a spares-box fuel tank, and some support brackets that I'd printed up myself. These were painted up, with some hairspray chipping on the fuel tank, and glued into place on the rear hull.
The track runs were now attached to the hull, a process which again was much easier with each run in two sections. Adding the separate top run did result in a very small gap at each end where I'd initially cut that section away. I had expected this, and the gaps were very minor and easily filled with an application of the same mud mixture I'd used on the lower hull, but this time applied without the texture paste binder. The dry mix was brushed over the track links, then fixed in place with drops of sand & gravel glue.

Lastly, the additional stowage I'd created was added to the build. The unditching beam and crate, both of which had been scratch built from scrap styrene were mounted to the rear hull using cotton cord as rope.
Additionally, a couple of resin stowage bundles from Value Gear were added to the turret, with the addition of some foil straps on one of the pieces to attach it to a grab rail.
In summary: 1/35th scale Soviet Object 703 Version II from Resin Scales
When I first took on this review build, I genuinely didn't know what to expect. This was the first off-the-shelf 3D printed kit I'd built, and I knew from my own printing experience that 3D printers are capable of extremely high detail, but they also have limitations and drawbacks which could potentially affect the kit. In the end, the model turned out to be a little of the latter, but far more of the former, with some quite beautiful detailing in places. The principal drawback is probably the print support structure which needs to be carefully removed, and the resultant clean up work, but these steps aren't as arduous as they may seem at first.

At the end of the day though, and despite the issues raised above, what surprised me most was that the finished model looked as good as any regular injection kit. In a lineup of models, nothing on this will jump out at you and shout “3D print”. While we're still very much in the early days of 3D printing, it's clear to me that the technology is going to play an increasingly important role in our hobby, whether it be through purchasing printed kits such as this, or printing components or entire models yourself at home. It's great to see companies like Resin Scales at the vanguard of this new era of modelling, creating interesting and unusual releases such as this one. If you're a WoT player looking for a game-related model, someone who likes more left-field armour subjects, or you're simply interested in trying out a 3D printed kit, then this comes highly recommended.


.jpg)